


Guide to the symbols / lights / buttons on Texecom Premier alarm keypad The Texecom Premier alarm keypad is made of keys with both numbers and sym
Guide to the symbols / lights / buttons on Texecom Premier alarm keypad
The Texecom Premier alarm keypad is made of keys with both numbers and symbols / icons – along with a series of indicator lights. If you’ve never been taught how to use the alarm, then these symbols can be quite confusing.
Here are the instructions on to how to use your Texecom Premier keypad and what these keypad button images / icons mean, and how to use your Texecom Premier alarm.

Premier alarm key pad instructions
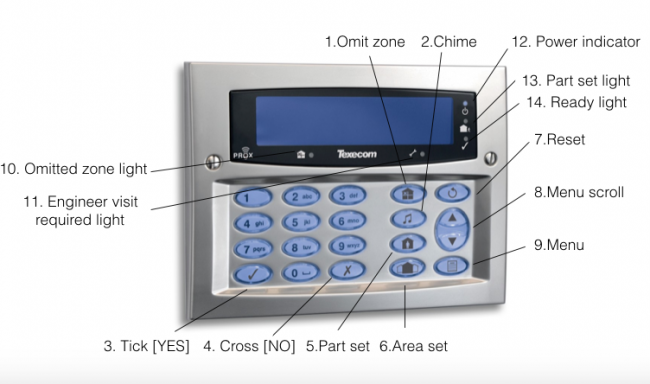
- 1 Omit zone: This ‘house with X button’ is used for omitting / by-passing one or more zones – enabling you to set your system whilst by-passing a specific zone (i.e. sensor in your property).
- 2 Chime: This ‘musical note button’ is used for turning the chime on and off
- 3 Tick [YES]: The Yes ‘tick button’ is used for arming your system or selecting options in the menu.
- 4 Cross [NO]: The No ‘cross button’ is used for dis-arming your alarm system and de-selecting options in the menu.
- 5 Part Set: The button with a ‘house and person inside’ is the ‘part set’ button, used for arming the system when inside the house (e.g. when you go to bed at night, and want only to set certain sensors in the property).
- 6 Area Set: The button with a ‘house with wings’ is the ‘area set button’ which is used to set / un-set specific Areas on your system. This is only used for larger properties in which you wan to divide up the alarm.
- 7 Reset: The reset button is used after an alarm activation or a system fault to return the alarm back to it’s normal status.
- 8 Menu Scroll: These arrows are used to scroll up and down the alarm system menu, to access additional services.
- 9 Menu: The menu button is used to access more advanced features and programming options.
- 10 Omitted zone light: This ‘House light with X’ will glow if one or more zones have been omitted.
- 11 Engineer visit light: This ‘spanner light’ will glow when there is a fault. When the system is free of faults it will not show.
- 12 Power indicator light: this is the power light, and will glow when there is mains power to the panel, and light will flash when the system is running on battery.
- 13 Part set light: This ‘house & man light’ is the ‘part set’ indicator. It will show when the system is part set, and not show when the part set is not active. The light will flash when setting / exiting.
- 14 Ready light: this means that the system is ready for arming. If this light flashes one or more zones have been violated / activated (and therefore need to be omitted if you require the system to be set).
Still need help?
If you need help using your Premier alarm keypad, then sign up for one of our alarm support services. Book a 20 minute telephone appointment with Marian, to talk you through how to use your Premier alarm system. Book appointment here >>

Organise a system maintenance
Or book an ‘on-site visit’ where one of our trained engineers comes out to your site to fix your problem / do a maintenance of your alarm system. Book an engineer visit here >>