


A Smart Security Guide to the basic functionality of the Texecom Veritas alarm, including setting, changing codes, editting chimes and viewing a log.
Veritas alarm user guide
The following are the various instructions you need to follow to use the basic functionality of your Texecom Veritas alarm.
If you want to download a .pdf of the Texecom Veritas alarm manual you can do it here – Texecom Veritas alarm manual otherwise, it’s probably easiest to scroll down the user guide summary below.
Full Set Alarm
Enter your four digit user code and press [FULL] . This option will arm all the sensors in your premises. e.g. press 1234 and then [FULL]
Part Set Alarm (with only 1 part set programmed)
Enter your four digit user code and press [PART] . This option will arm the sensors included in the part set. e.g. press 1234 and then [PART]
Part Set Alarm (with 2-4 part sets programmed)
Enter your four digit user code then the part set number and then press [PART] . This option will arm the sensors included in that particular part set. e.g. press 1234 (your code number) and then 1,2,3 or 4 (representing the part you want to set) and then [PART]
Unset Alarm
After entering the property, enter your four digit user code. e.g. 1234
Reset Alarm after activation
Enter your four digit user code then press [RESET] .
Change your own code
Enter your four digit user code and press to enter the use menu. The LED lights 1-8 should be red.
Press [60] + [your new code] + [PROG]. The alarm will make a chime noise twice to confirm your new code has been accepted. Press [RESET] twice to exit.
Assign a new access/user code
Enter your four digit user code (Master User only) and press [PROG]. Enter [6] to select the Change Access code option then the User Number (1 – 8) you wish to change, e.g. press [5] and then enter your new 4 digit user code and press [PROG]. The system will chime to confirm the new code.
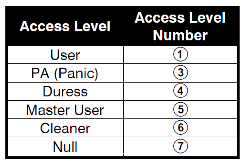
Next enter [7] and the same user number (1 – 8) as before e.g. [5] again. Enter their new Access Level (1 – 8) from the options below:
Press [PROG] , the system will chime to confirm the new Access Level. Press [RESET] twice to exit.
Temporarily bypass a zone when arming
Enter your four digit user code and choose your setting option, i.e. [FULL] or [PART] . Then press the [OMIT] button and the zone number(s) you want to bypass. Press [PROG] and the system will start to set.
E.g. to full set the system without zone 5:
1234 + [FULL] + [OMIT] + 5 + [PROG]
Turn chime facility on/off
Press [MUSICAL NOTE BUTTON] . The system will sound the chime tone when chime is turned on and an error tone when chime is turned off.
Change which zones chime
Enter your four digit user code then press[MUSICAL NOTE BUTTON] . Press the appropriate numbered button(s) of the individual zone(s) so that the zones you want to chime are illuminated. Press [PROG] to accept the new zones to chime.
Check sensors are working correctly (WALK TEST)
Enter you four digit user code + [PROG] + [0] [6] . The system is now in walk test mode. (It is advisable to perform this test with 2 people – one person watching the keypad and one person walking round the property). Each zone corresponds to the LED lights 1-8. Check each LED lights up red when each sensor is activated and should turn off once each sensor deactivates. When you have finished, press [RESET] twice to exit.
View the seven event basic log
Enter your four digit user code and press [PROG] to enter the use menu. Press [4] followed by number corresponding to the desired event, 1 being most recent and 7 least recent. The zone that caused the initial alarm activation will flash, and any subsequently opened zones will also be shown (not flashing). When you have finished, press [RESET] twice to exit.
Still need help?
If you still need help and don’t want to spend much money you could opt for our telephone support service, where you pay for 20 mins remote technical support to fix your problem. CLICK HERE TO BOOK YOUR SUPPORT CALL >>

Unfortunately, a lot of faults can’t be fixed via the telephone, so the other option is to book an site visit by one of our engineers to fix the problem live in your property. Book here >>

COMMENTS