


This troubleshooting guide provides step-by-step instructions on essential tasks and solving common problems with the Kentec Fire Panel. Whether
This troubleshooting guide provides step-by-step instructions on essential tasks and solving common problems with the Kentec Fire Panel. Whether you’re new to the system or seeking to optimize its functionalities, this comprehensive resource has got you covered.

Common problems
Common Faults with the Kentec Fire alarm system – Taktis
The following is a list of the common faults with an Kentec Fire alarm system, including user set-up and programming problems:
- Kentec fire alarm system buzzing / beeping: how to stop the buzzer on the Kentec Taktis fire alarm
- Fault with zone: how to disable / enable a zone on the Kentec fire alarm
- Sounder going off: how to turn off sounder on Kentec fire alarm
- False alarming: how to stop a false alarm on the Kentec fire alarm, and disable outputs
How do I set date and time on the Kentec Taktis?
To set the date and time on the Kentec Taktis:
- Press “Set Date & Time” button on the Fire System Normal window.
- When the Set & Time window is displayed: adjust the Time and Date accordingly.
- Press “Apply” button to set the new parameters.
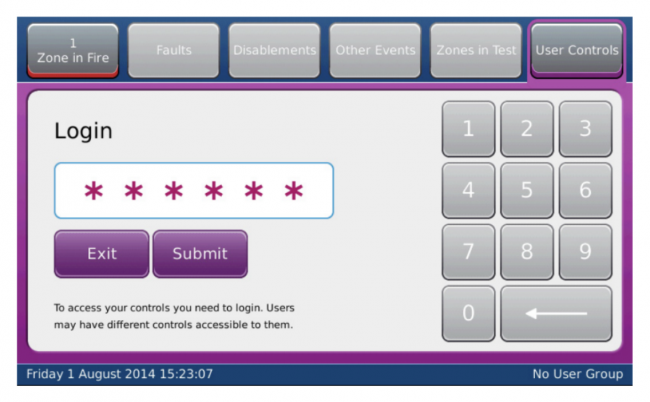
How do I enter Access Level 2 on the Kentec Taktis panel?
You can enter Access Level 2 by inputting a six-digit password or by using a key switch.
To access through a password:
- Touch Screen Display
- Insert Default password “222222”
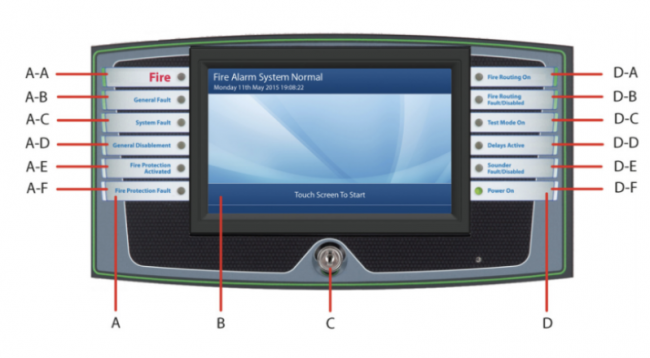
To access through a key switch:
- Insert the key into the keyslot (C) below the touchscreen display in the centre of the bezel.
- Turn the key 45 degrees clockwise to enable the controls.
- Once the Key is turned, the text in the bottom right of the display changes from “No User Group” to “Key Level 2”.

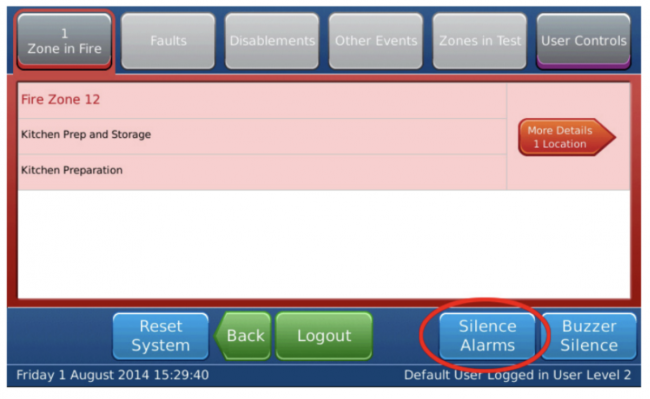
How do I silence the sounder on the Kentec Taktis?
Press the “Silence Alarms” button as shown below to silence the sounders that have been activated. Once the button has been pressed its status changes to “Re-Sound Alarms” to allow the user to re-evacuate the building if required.
- Press the “Reset System” button on the touchscreen display.
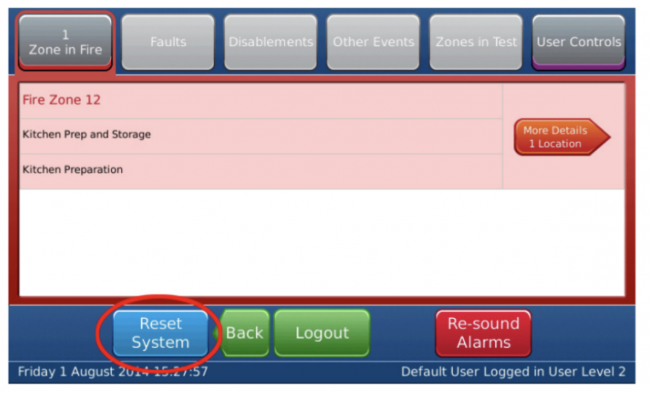
- After the ‘Reset’ has been completed the system will return the user to the ‘Fire System Normal’ screen.
- Press the “Logout” button or if the keyswitch was used turn the enable access key to the left to exit Key Level 2 and remove the key.

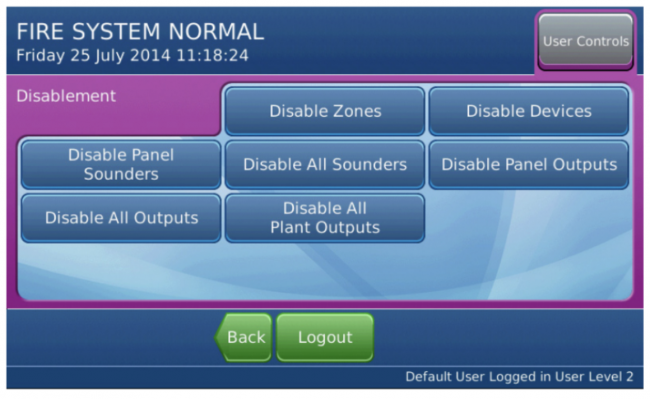
How do I enable/disable zones on the Kentec Taktis?
To access the enable/disable option:
- Access User Controls by pressing the button on the top right of the touchscreen display.
- Press the “Disablements” button from the User Controls screen.
- Select the Zone button on the touchscreen display, each disablement option is described
To disable zones on the Kentec Taktis Panel:
- Press “Disable Zones” button on the Fire system Normal window.
- Press the empty box adjacent to the Disabled Zone(s) on the Fire System Normal window.
- Press the “Details View” button on the Fire System Normal window.
- Press the “Submit” button.
- Press “No” and this will then give the option to change the field to “Yes” in the Include Call Points box if required.
- Press the “Submit” button.
- Press the “Disablement” button in the top navigation.
- Press the “More Details” button.
- Press the “Disable” button on the top navigation bar.
- Press the “Enable” or “Enable All” button to re-enable the disabled Zone(s)
- Press the window.
- Press the “Logout” button.
- The No User Group authorisation on the window is displayed.
How to Disable/Re-Enable Devices on the Kentec Taktis fire alarm panel?
To disable devices:
- Press “Disable Devices” button on the ‘Fire System Normal’ window.
- Devices can be disabled either by Loop or Zone.
How do I disable loops on the Kentec Taktis fire alarm panel?
Press “Loop X” button. Where X is the required loop number from 1 (up to) 16.
The number of options displayed will depend upon the different device types fitted to the loop, the system will provide options to select by device types fitted or by the “All” option which selects all the devices fitted to the loop. To select any of the options:
- Press inside the checkbox to select (multiple selections are allowed) and a green tick will be displayed when successfully selected.
- Once a green tick is displayed, the “Show” button will become active, press the “Show” button and this will list all the devices selected on the selected Loop that can be disabled.
- Press the “More Details” button on the device that you wish to disable.
- Press the “Disable” button to disable the selected device.
- Press the “Disablement” button on the top navigation bar. (Note this will show all devices that have been disabled)
- Press the “More Details” button.
- Press the “Disable” button on the top navigation bar.
- Press the “Enable” button to re-enable the required devices that have been previously disabled.
- Press the window.
- Press the “Logout” button.
- The No User Group authorisation on the window is displayed.
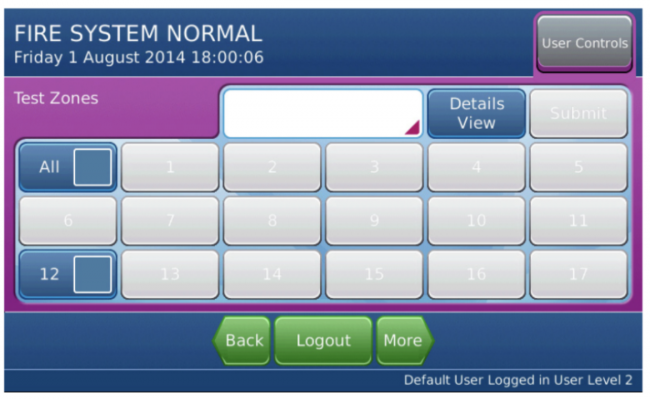
How do test zones on the Kentec Taktis Fire alarm panel?
The Test Zones feature allows operators to conduct testing without manually resetting the FACP between activations.
- Press the “Test Zones” button.
- Press inside the checkbox(s) required to either select “All” zones or individually select the required zone(s) to test (multiple selections are allowed) and a green tick shows when successfully selected a zone to test.
- Once all the required zones have been selected press the “Details View” button.
- Once it has been verified the required zones have been selected press the “Submit” button.
- Zones can be tested with or without the system sounders being active.
- To change the setting, press “Box showing the current option” (Yes/NO) and this will then give the option to change the field to the opposite setting if required to change.
- Press the “Submit” button to begin the test of the selected zone(s).
- Press the “X Zones in Test” button on the top navigation bar (where X is the number of zones in test).
- Press the “X Zones in Test” button on the top navigation bar or the “Back” button to return to the previous window.
- Press the “Restore All” button to cancel the test of all Zone(s) in test or press the “Enable” button next to each zone to take that zone out of test.
- Press the window.
- Press the “Logout” button.
Still, need help?
Book a Kentec fire alarm engineer to fix your Kentec fire alarm fault
We’re specialists in helping fix problems with Kentec Fire alarm systems. If you want to fix a fault or book a maintenance engineer to service your Kentec Fire alarm, then get in contact with our team. Our fire alarm engineers can provide:
- Fire alarm fault fix: our experienced fire alarm engineers can help fix problems with your Kentec fire alarm
- Maintenance service for HAES fire alarm: we have maintenance engineers who can visit your site and service your Kentec fire alarm
Our fault-finding and maintenance engineers specialising in Kentec alarms operate across the UK. We have Kentec fire alarm engineers in London, Birmingham, Cannock, Leeds, Manchester, Doncaster, Wakefield and York. Book an engineer visit here or email us at help@smartsecurity.support