


How to change your Texecom Veritas R8 alarm keypad There are a number of reasons why you need to replace your alarm keypad, for example: Button
How to change your Texecom Veritas R8 alarm keypad
There are a number of reasons why you need to replace your alarm keypad, for example:
-
- Buttons on Veritas alarm keypad are not working
-
- Veritas keypad numbers on alarm keypad are worn out
- The front plastic cover on your keypad has gone yellow,, and is not esthetically nice anymore (this happens as plastics age over time)
- Veritas alarm keypad not working / dead
- General faults with Veritas alarm keypad
N.B. if you don’t want to fix your Veritas alarm keypad yourself, you can book an engineer visit from one of our professional engineers to fix the problem for you at your property. Book your appointment here >>

If you think you’ve got the skills, before starting to replace your Texecom Veritas R8 alarm keypad, you need to consider a number of things (so you don’t mess up!). Key considerations are:
- The Internal sounder will go off if you don’t know the engineers code for your alarm
- Make sure you don’t short bare wires (as this will blow your alarm panel fuse)
- Remember to match settings on dip switch
- Reset alarm after keypad change
Additionally, pre-2000 year Veritas alarm panels may have a problem with entry sounds for part sets when you use new keypads. In this case, other functions will not be affected. If you have a pre-2000 year panel, a full panel replacement is advisable.
You can easily buy a replacement Veritas R8 keypad from our store. Buy R8 keypad here >>
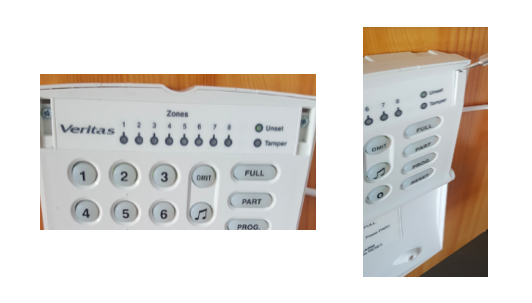
Guide to replacing your alarm keypad
- Enter engineers code & enter programming mode
To avoid internal sounder going off, ideally you want to have engineers code and enter “programming mode” ( enter engineers code+press Prog.).
If you don’t know engineers code, internal sounder will go off when you take off front cover of a keypad. Type your user code to silence the sounder. Wearing earplugs may be handy in here 🙂
You’ll need to reset your alarm after keypad change ( type your code+ press reset ).
- Remove screws
Newer keypads will have two screws hidden behind plastic covers on the top front panel. One of right, one on the left.
Older keypads will opening from bottom – you’ll see little rectangular opening underneath.
- Unscrew & remove wires from terminals
After undoing front panel, undo wire terminals in order: R than T than minus last plus terminal. Make sure you don’t short bare wires. Isolate them with tape, or simply cut the bare wire off with cutters.
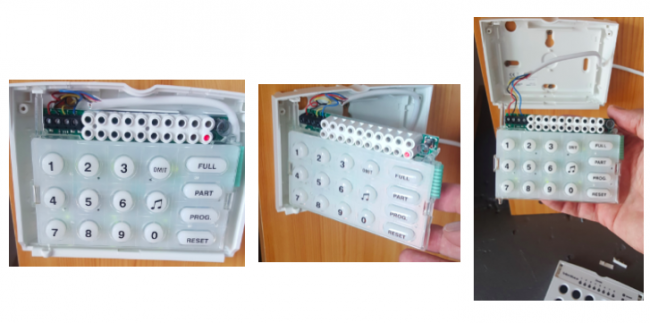
Undo rear cover, fit new keypad and connect wires in order: R > T > minus > plus.
After you re-assembled all parts of the keypad, you may have to type your code and press [RESET].
N.B. If you’ve shorted the wires (by touching them together), you may have to restart your panel (by power down for a sec or two). Older Veritas alarm panel versions will have glass fuse for keypad in the main control panel. This may have to be replaced if blown.
If have have more than just one keypad you’ll need to repeat the process. N.B. make sure you look at the side of the PCB and match the settings on dip switch.

Still need help?
If you need help replacing your alarm keypad, then sign up for one of our alarm support services. Book a 20 minute telephone appointment with Marian, to talk you through what to do. Book appointment here >>

Or book an ‘on-site visit’ where one of our trained engineers comes out to your site to fix your problem. Book an engineer visit here >>