


Welcome to our troubleshooting guide for the C-Tec XFP fire alarm panel. Here, we provide practical insights and solutions to common problems with th
Welcome to our troubleshooting guide for the C-Tec XFP fire alarm panel. Here, we provide practical insights and solutions to common problems with the C-Tec alarm panel to ensure the smooth functioning of your fire safety system. From understanding normal operations to tackling fault indicators and managing functionalities, this guide will give you the know-how to safely operate the C-Tec XFP fire alarm panel.
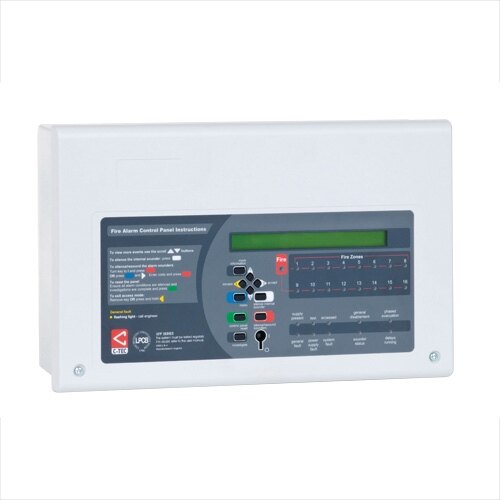
Common Faults with the C-Tec fire alarm system – XFP
The following is a list of the common faults with an C-Tec fire alarm system, including user set-up and programming problems:
- AC-Tec fire alarm system buzzing / beeping: how to stop the buzzer on the C-Tec XFP fire alarm
- Fault with zone: how to disable / enable a zone on the C-Tec fire alarm
- Sounder going off: how to turn off sounder on C-Tec fire alarm
- False alarming: how to stop a false alarm on the C-Tec fire alarm, and disable outputs
Try Super Engineer AI to fix your C-Tec
If you need help with your C-Tec or any technical issue, try Super Engineer – a specialist AI assistant for technicians, trained specifically to fix technical issues.
Super Engineer has been trained on 1000’s of technical instruction manuals, including C-Tec, so can easily help you fix your tech problems – in an instant!
It’s FREE to try, so give it a go at www.SuperEngineer.app

How does the C-Tec XFP fire alarm panel operate?
Normal Condition:
- The display shows “Normal” when no fires, faults, or pre-alarms are detected.
- The display shows “Normal: occupied” when the panel is in day mode.
- The display shows “Normal: unoccupied” when the panel is in night mode.
- Day/night settings are typically programmed by a system engineer.
Fire Condition:
- General Fire indicator flashes.
- Internal sounder pulses.
- Relevant Fire Zone indicator flashes.
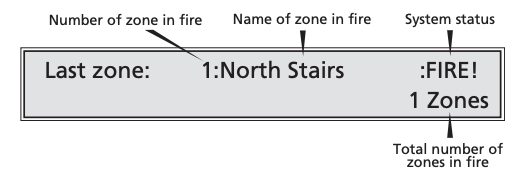
- The display shows the number and name of the zone in fire.
- The More Information button provides details of the device triggering the fire.
For example:
How do I test the sounders on the C-Tec XFP fire alarm panel?
Momentarily pressing the SILENCE/RESOUND SOUNDERS button when the alarm sounders are silenced will resound them. Pressing the SILENCE/RESOUND SOUNDERS button again will silence the alarm sounders.
How do I enter Access Level 2 on the C-Tec XFP fire alarm panel?
Access Level 2 is for authorised users only and access to it requires the input of a special four-digit code using the panel’s pushbuttons, or by turning the panel’s key switch to the armed position (I).
To gain entry:
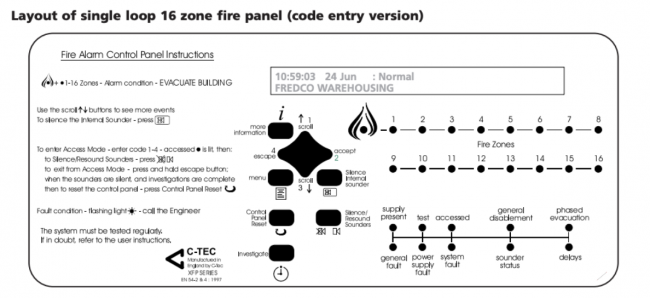
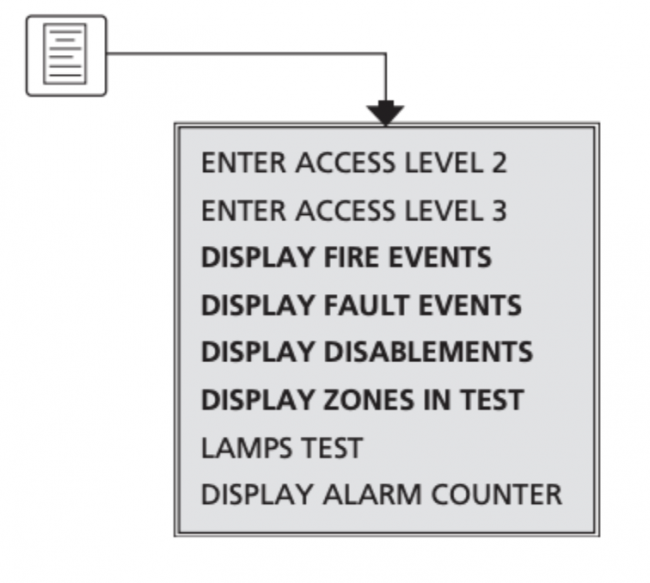
- Press the MENU button on the panel’s front at access level 1. The panel’s general user menu is displayed (see picture below) which can be navigated using the panel’s Accept (4) and Escape (3) buttons as appropriate.
- When the ENTER ACCESS LEVEL 2? prompt appears, press the Accept4button
- You will be asked to enter the code: Enter the access level 2 code using the (1), (2), (3), (4) buttons as appropriate. The default code to access level 2 is 3 3 3 3.
How do I return to Access Level 1 on the C-Tec XFP fire alarm panel?
To return to the main Access Level 1 menu press the Escape (3) button.
How do you reset the XFP fire alarm panel?
Activate Access Level 2 and press the Reset button on the panel’s front.
How can I test the LED Indicators on the C-Tec XFP fire alarm panel?
To test the LED indicators:
- Enter the menu, scroll down
- Select Lamp Test
- Press Accept (2) button
- All of the panel’s LED indicators will illuminate steady for approximately two seconds and its display will progressively block fill. The panel’s internal sounder (if enabled) will also sound.
- Upon completion, the panel will return to the main Access Level 1 menu.
If any of the indicators fail to illuminate or the display does not function correctly, report the fault(s) to the designated site engineer and make a note of it in the Fire Alarm Log Book (page 21).

How can I mute the internal buzzer on the C-Tec XFP fire alarm panel?
Mute the panel’s internal beeper by pressing the Silence Internal Sounder button.
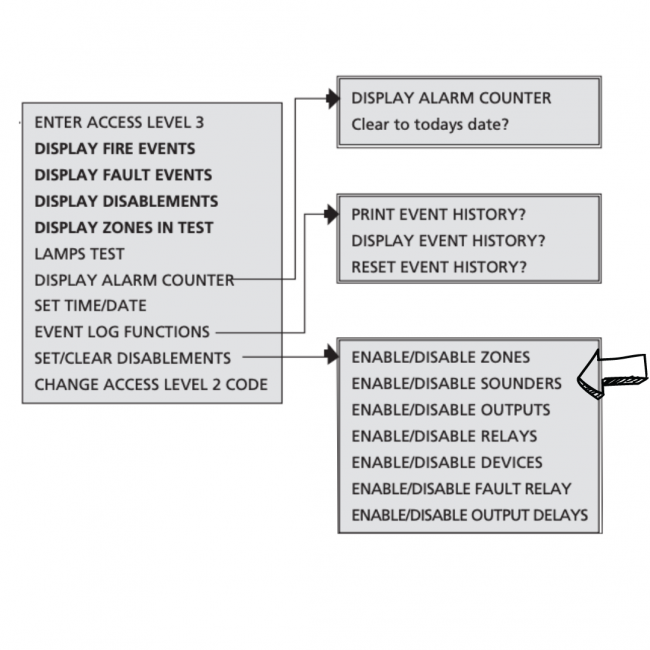
How do I enable/disable sounders on the XFP fire alarm panel?
To enable/disable sounders:
- Enter Access level 2.
- Select Set/clear Disablements.
- Scroll to “Enable/Disable Sounders”.
- Press the Accept (2) button – a window similar to the one below will appear.

- Select the sounder group (1 to 16 or ALL) to be disabled/enabled using the arrows (buttons 1 and 3).
- Press the Accept (2) button.
- To exit, press the Escape (4) button.
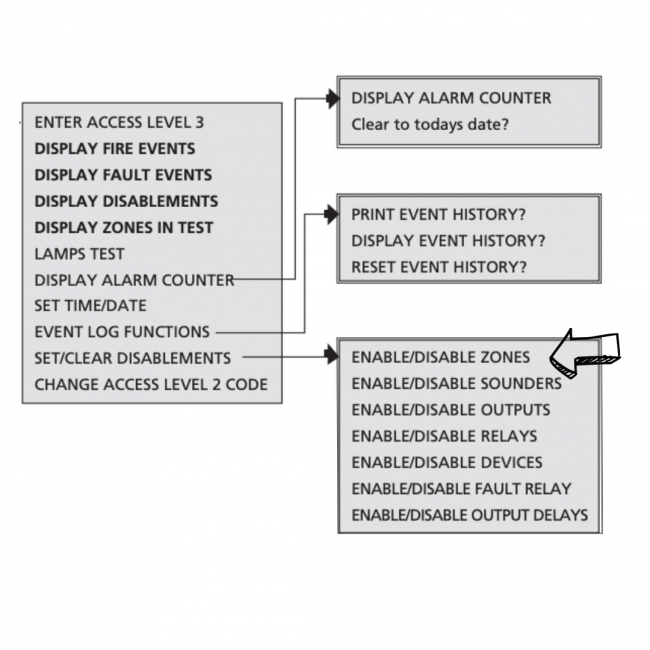
How do I enable/disable zones on the XPF Fire Alarm Panel?
To enable/disable zones:
- Enter Access Level 2.
- Select Set/Clear Disablements.
- Scroll to “Enable/Disable Zones”.
- Press the Accept (2) button – a window similar to the one below will appear.

- Select the desired zone using the arrows (buttons 1 and 3).
- Press the Accept (2) button – the zone status will flash.
- Use buttons (1) and (3) to toggle between disabled/enabled.
- Press the Accept (2) button.
- To exit, press Escape (4) button.
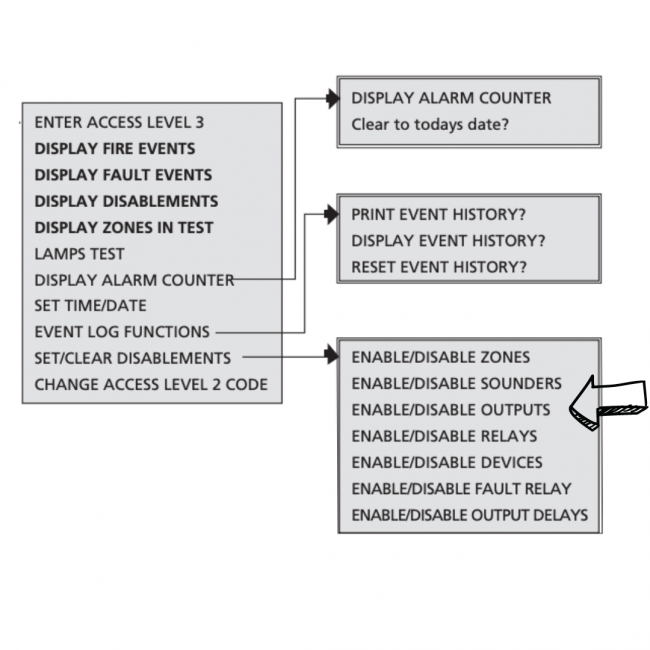
How do I enable/disable outputs on the C-Tec XFP Fire Alarm Panel?
To enable/disable outputs:
- Enter Access Level 2.
- Select Set/clear Disablements.
- Scroll to “Enable/Disable Outputs”.
- Press Accept (2) button – a window similar to the one below will appear:

- Select the desired output using the arrows (buttons 1 and 3).
- Press the Accept (2) button – the output’s status will flash.
- Use buttons 1 and 3 to toggle between disabled/enabled.
- Press the Accept (2) button.
- To exit, press the Escape (4) button.
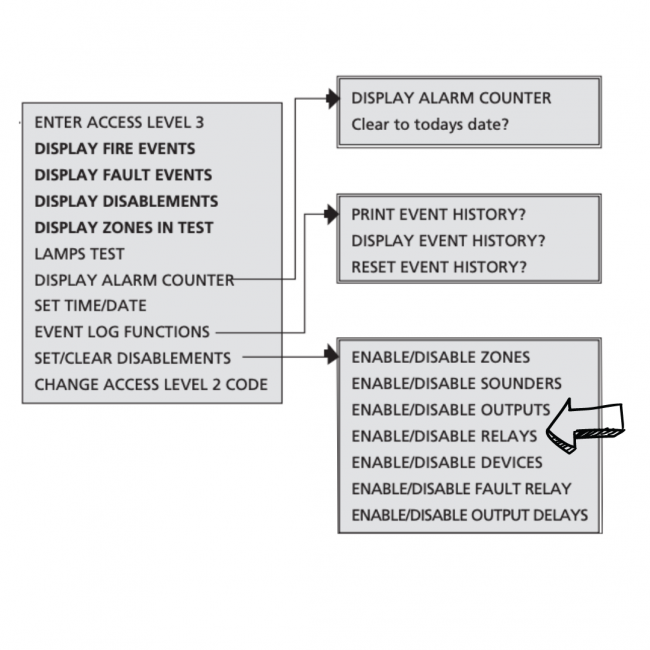
How do I enable/disable relays XFP Fire Alarm Panel?
To enable/disable relays:
- Enter Access Level 2.
- Select Set/Clear Disablements.
- Scroll to “Enable/Disable Relay”
- Press the Accept (2) button – a window similar to the one below will appear:

- Select the desired relay using the arrows (buttons 1 and 3).
- Press the Accept (2) button – the relay’s status will flash.
- Use buttons (1) and (3) to toggle between disabled/enabled.
- Press the Accept (2) button.
- To exit, press the Escape (4) button.
How do I enable/disable devices C-Tec XFP Fire Alarm Panel?
To enable/disable devices:
- Enter Access Level 2.
- Select Set/clear Disablements.
- Scroll to “Enable/Disable Devices”.
- Press the Accept (2) button – a window similar to the one below will appear.

- Use the arrows (buttons 1 and 3) to select the zone where the device you wish to enable/disable is located.
- Select the zone by pressing the Accept (2) button. A list of all devices in the zone will appear.
- Find the desired device using the arrows (buttons 1 and 3).
- Press the Accept (2) button – the device’s status will flash.
- Use buttons 1 and 3 to toggle between disabled/enabled.
- Press the Accept (2) button.
- To exit, press the Escape (4) button.

Please note: if all the input devices on a zone are individually disabled, the zone they belong to will also be disabled.
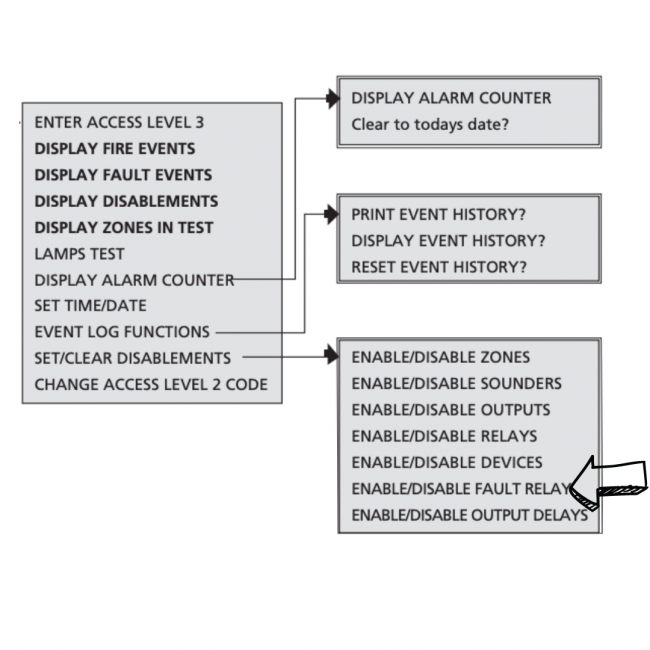
How do I enable/disable fault relay on the C-Tec XFP Fire Alarm Panel?
To enable/disable fault relay:
- Enter Access Level 2.
- Select Set/clear Disablements.
- Scroll to “Enable/Disable Fault Relay”.
- Press the Accept (2) button.
- Use the arrows (buttons 1 and 3) to toggle between Enable/Disable.
- Press the Accept (2) button.
- To exit, press the Escape (4) button.
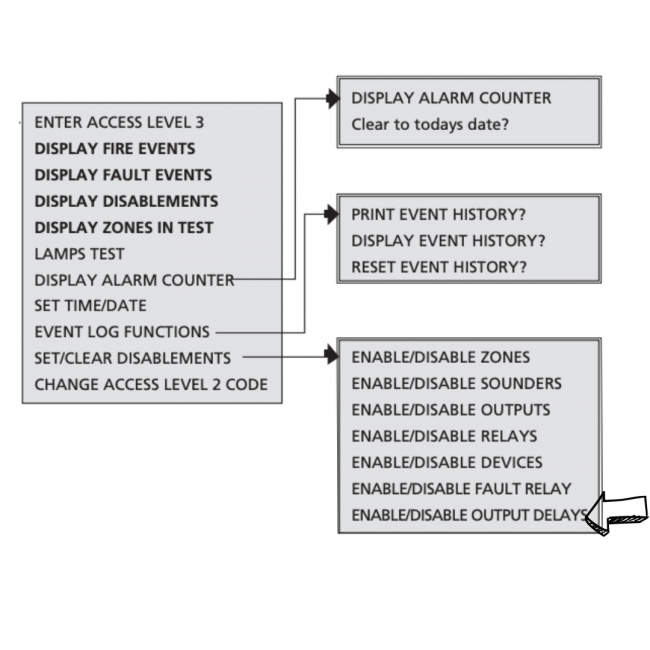
How do I enable/disable output delays on the C-Tec XFP Fire Alarm Panel?
To enable/disable output delays:
- Enter Access Level 2.
- Select Set/clear Disablements.
- Scroll to “Enable/Disable Output Delays”.
- Press the Accept (2) button.
- Use the arrows (buttons 1 and 3) to toggle between Enable/Disable.
- Press the Accept (2) button.
- To exit, press the Escape (4) button.
How do I change the Access Level 2 code on the C-Tec XFP Fire Alarm Panel?
To change the Access Level 2 code:
- Enter Access Level 2.
- Open Menu.
- Select “Change Access Level 2 Code” and the following window will appear:

- Use the arrows to input the new four-digit code.
- After the fourth digit, the panel will ask you to re-enter the code.
- Enter the code again.
- The panel will take you to access level 1 again.
Please note: Be sure to keep a record of the new code on page 20 of the user manual. Although the CHANGE ACCESS LEVEL 2 CODE menu option IS available on keyswitch versions of the panel, any changes to the code WILL NOT affect the panel’s operation, i.e. access to the panel’s authorised user menu will still be available via the panel’s keyswitch.
Still need help? Try Super Engineer AI
If you need help with your C-Tec or any technical issue, try Super Engineer – a specialist AI assistant for technicians, trained specifically to fix technical issues.
Super Engineer has been trained on 1000’s of technical instruction manuals, including C-Tec, so can easily help you fix your tech problems – in an instant!
It’s FREE to try, so give it a go at www.SuperEngineer.app